In this blog, I will discuss how to create a Bootable USB using quick and easy methods.
To create a bootable USB drive manually, we can use either the Command Prompt or bootable USB maker software.
Here is a step-by-step guide to create a bootable USB drive as the Windows installation media.
To create a bootable USB drive for Windows installation, you only need a flash drive with at least 4 GB of capacity. A larger capacity is better.
Various Steps to Create a Bootable USB Drive
Step 1: Using the DISKPART Command
Plug your USB flash drive into your computer. Run the Command Prompt as administrator.
For this, right-click on the CMD and select “Run as administrator.”
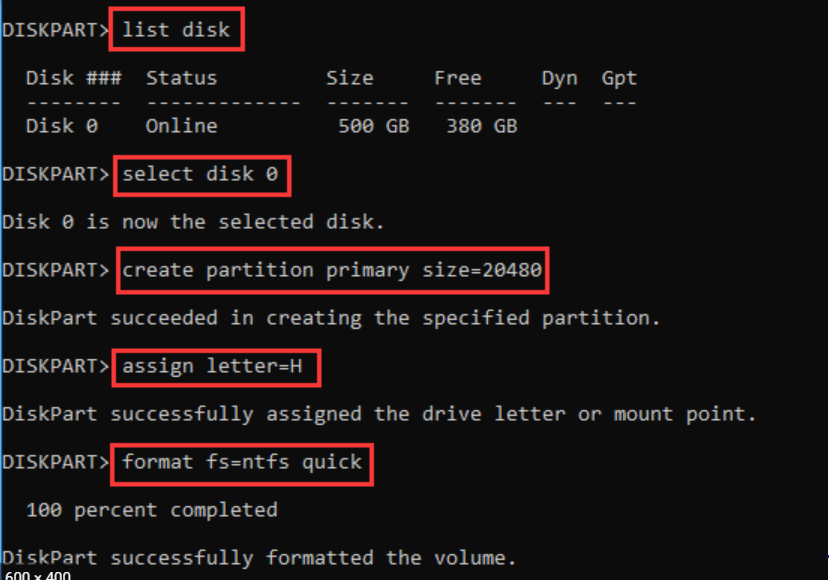
Type diskpart on the CMD screen and hit enter.
Type “list disk” and press Enter to view the active disks on your computer. There will be a list of disks shown, with Disk 0 representing the hard drive and Disk 1 representing your device.
USB flash drive with its total capacity.
To proceed further, you must select Disk 1 for this type. Select disk 1 and hit enter.
Type ‘clean’ and hit Enter to erase all data on the drive.
Type ‘create partition primary’ and hit Enter. It will create a primary partition, and it will now be seen as partition 1.
Type “select partition 1” and press Enter to select partition 1 and set it up as an active partition.
Type “active” and press Enter to activate the current partition.
Type format fs=ntfs quick and hit enter, it will format the current partition as NTFS file system quickly.
Type exit and hit Enter. This will exit the DISKPART program, but don’t close the CMD window; we will still need it for the next step.
Step 2: Creating a Boot Sector
After completing the above steps, you have to set the path to the executable file in your Windows saved folder. Ensure that your Windows folder contains a boot folder with the bootsect executable file.
Type cd boot and hit Enter. Active directory changed to F:\boot>.
Type bootsect /nt60 d: and hit Enter. Creating a boot sector on D: drive (USB flash drive).
Type exit and press Enter to close the CMD.
Now, we have successfully made a bootable USB drive, and the flash drive is ready to be used as boot media.
Step 3: Copying Installation Files
To install Windows from the newly created bootable USB drive, we need to copy the Windows installation files to the flash drive.
To do this, open the Command Prompt. In the CMD screen, type xcopy f:\* *. * d: \ / E / H / F and then press Enter.
Once all the files have been copied to the flash drive, the bootable USB drive is ready for use in installing Windows.
Software to Make a Bootable USB
One of the easiest ways to create a bootable USB drive is by using specialized software. Here is a list of the top software.
1. Rufus
Rufus is a very small software with fewer options to play with, aside from partition scheme, file systems, cluster size, and the type of bootable you’ll be creating.
Select the type of bootable disk you want to create an ISO image for, press Start, and wait for the process to finish.
It also has its own timer, which showed 17.02, though the built-in timer did fluctuate throughout the process. It is still a good time.
2. Windows 7 USB/DVD Download Tool
One of the easiest ways is to use this tool. Select your ISO. Select your media type: a USB or a DVD.
Click Begin Copying, and you are done. It has the most basic of basic Graphical User Interfaces, with only two options: the Windows 7 USB/DVD.
The Download Tool is remarkably simple, comparable to ISO to USB. Timing-wise, it clocked in with 16m53s.
3. RMPrepUSB
RMPrepUSB is one of the comprehensive ISO-to-USB packages available on the market.
It comes packed with features like Bootloader options, file systems and overrides, GRUB4DOS, SYSLINUX, QEMU Emulator, and several other utilities.
It also features other useful tools, including Speed Tests, BootLoaders, DiskDoctor, and individual user configurations for frequently used drives.
RMPrepUSB is not the fastest, clocking in at 22m36s, but it offers some additional customizable options, such as a centralized tooltip and constantly updating content as you scroll over menu items.
With a time of 22m36s, RMPrepUSB isn’t the fastest of the rest. Still, it offers some additional customizable options, such as a centralized tooltip and content that updates constantly as you scroll over menu items.
4. WinSetupFromUSB
WinSetupFromUSB offers a mid-range of features.
Unlike other tools with numerous options, it offers significantly more functionality than the other basic burners we have discussed above, particularly in combination with the FBinst Tool, Bootie, and RMPrepUSB.
Each of these additional features comes with pop-up instructions detailing their use, alongside WinSetupFromUSB. However, all can be used with their original functions.
With a speed of 23m29s, this tool is one of the slower options on the list, but it is included due to the extensive customization available to users and other user-friendly features.
5. UltraISO
You can use the UltraISO trial version as an ISO to USB tool.
The trial version only restricts the size of ISOs created, but it is not a major issue if you’re burning something created elsewhere.
After opening UltraISO, navigate to the ISO location in File Explorer.
Once the ISO file is located, double-click on it to open it. This will load the ISO image for burning.
Then head towards Bootable > Write Disk Image. Ensure you use the USB-HDD+ option for optimal results. Hit Write and you are done.
UltraISO clocked in at 20m24s, placing it in the middle among other tools, neither the fastest nor the slowest. It offers a hard completion to WiNToBootic, which is similarly timed, thanks to its additional features like ISO creation and image mounting.
FAQs | How to create a Bootable USB?
🤔 How do I create a bootable USB drive?
Open the program with a double-click. Select your USB drive in “Device”. Select “Create a bootable disk using” and the option “ISO Image”. Right-click on the CD-ROM symbol and select the ISO file. Under “New volume label,” you can enter a name of your choice for your USB drive.
🤷♂️ Are all USB drives bootable?
Any modern USB stick emulates a USB hard drive (USB-HDD). At boot time, the BIOS can be configured to check the USB stick to see if it has been marked as bootable with a valid boot sector. If so, it will boot just like a hard drive with similar settings in the boot sector would.
🙋♀️ How can I tell if my USB is bootable?
Download MobaLiveCD from the developer’s website. After the download is complete, right-click on the downloaded EXE and choose “Run as Administrator” from the context menu. Click on the button labeled “Run the LiveUSB” in the bottom half of the window. Choose the USB drive you want to test from the drop-down menu.
🤙 Is an ISO file bootable from a USB?
If you choose to download an ISO file so you can create a bootable file from a DVD or USB drive, copy the Windows ISO file onto your drive, and then run the Windows USB/DVD Download Tool. … This allows you to install Windows onto your machine without having first to run an existing operating system.
Quick Links:
- How To See Patreon Posts For Free?
- How To Block Someone On TikTok?
- How to Set Up iOS Calendar Syncing?
Conclusion | How To Create A Bootable USB [2025]
As you can see, there are many options available for creating a bootable USB Drive.
Select one of the options that suits you, follow the instructions in the specified method above, and then start creating a bootable USB Drive.
You can also choose one of the software listed above to create a bootable USB drive with ease.
I hope this post suits your purpose well.
Don’t forget to share this post with your friends, family, and colleagues on all social media platforms.